Flutter 初探
官网 https://flutter.io/
中文网 https://flutterchina.club/
Flutter ,Weex , RN … 跨端开发方案

介绍
Flutter是谷歌的移动UI框架,可以快速在iOS和Android上构建高质量的原生用户界面,并且是未来新操作系统Fuchsia的默认开发套件。自从2017年5月发布第一个版本以来,目前Flutter已经发布了近60个版本,并且在2018年5月发布了第一个“Ready for Production Apps”的Beta 3版本,6月20日发布了第一个“Release Preview”版本,9月19日发布了
Flutter Release Preview 2 版本,也是1.0之前的最后一个预览版本。
开发语言Dart
Dart是一种强类型、跨平台的客户端开发语言。具有专门为客户端优化、高生产力、快速高效、可移植(兼容ARM/x86)、易学的OO编程风格和原生支持响应式编程(Stream & Future)等优秀特性。Dart主要由Google负责开发和维护,在2011年10启动项目,2017年9月发布第一个2.0-dev版本。
为什么选择dart 做为Flutter开发语言?
- dart 团队在flutter团队旁边,支持更有效
- dart具有jit&Aot双重编译执行方式。这样就能利用JIt进行开发阶段的hot reload开发,提升研发效率。同时在最终release版本中使用aot将dart代码直接变成目标平台的指令集代码。简单高效,最大限度保障了性能
- dart针对flutter中频繁创建销毁Widget的场景做了专门的gc优化。通过分代无锁垃圾回收器,将gc对性能的影响降至最低
- dart语言在语法上面是类java的,易学易用
- 健全的类型系统,同时支持静态类型检查和运行时类型检查
- 丰富的底层库,Dart自身提供了非常多的库

DartVM的内存分配
Flutter对Dart源码做了AOT编译,直接将Dart源码编译成了本地字节码,没有了解释执行的过程,提升执行性能,Dart的”线程”(Isolate)是不共享内存的,各自的堆(Heap)和栈(Stack)都是隔离的,这种分配策略可以让Dart实现无锁的快速分配 ,而彼此之间通过消息通道来通信,
Dart VM将内存管理分为新生代(New Generation)和老年代(Old Generation)。
- 新生代(New Generation): 通常初次分配的对象都位于新生代中,该区域主要是存放内存较小并且生命周期较短的对象,比如局部变量。新生代会频繁执行内存回收(GC),回收采用“复制-清除”算法,将内存分为两块(图中的from 和 to),运行时每次只使用其中的一块(图中的from),另一块备用(图中的to)。当发生GC时,将当前使用的内存块中存活的对象拷贝到备用内存块中,然后清除当前使用内存块,最后,交换两块内存的角色。
- 老年代(Old Generation): 在新生代的GC中“幸存”下来的对象,它们会被转移到老年代中。老年代存放生命力周期较长,内存较大的对象。老年代通常比新生代要大很多。老年代的GC回收采用“标记-清除”算法,分成标记和清除两个阶段。在标记阶段,所有线程参与并发的完成对回收对象的标记,降低标记阶段耗时。在清理阶段,由GC线程负责清理回收对象,和应用线程同时执行,不影响应用运行
Flutter 架构

StatelessWidget 和 StatefulWidget的区别
StatelessWidget是状态不可变的widget。初始状态设置以后就不可再变化。如果需要变化需要重新创建。StatefulWidget可以保存自己的状态。那问题是既然widget都是immutable的,怎么保存状态?其实Flutter是通过引入了State来保存状态。当State的状态改变时,能重新构建本节点以及孩子的Widget树来进行UI变化。注意:如果需要主动改变State的状态,需要通过setState()方法进行触发,单纯改变数据是不会引发UI改变的
StatefulWidget state生命周期


didChangeDependencies有两种情况会被调用。
- 创建时候在initState 之后被调用
- 在依赖的InheritedWidget发生变化的时候会被调用,正常的退出流程中会执行deactivate然后执行dispose。
- 但是也会出现deactivate以后不执行dispose,直接加入树中的另一个节点的情况。
这里的状态改变包括两种可能:
- 通过setState内容改变
- 父节点的state状态改变,导致孩子节点的同步变化
widget 基础组件
一切即Widget。在flutter的世界里,包括views,view controllers,layouts等在内的概念都建立在Widget之上。
Container
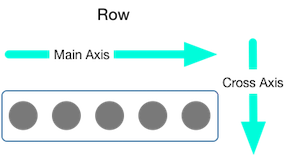
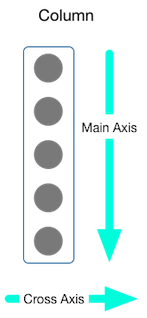
容器,一个常用的控件,由基本的绘制、位置和大小控件组成。负责创建矩形的可视元素,可以用BoxDecoration来设计样式,比如背景、边框和阴影,Container也有边距、填充和大小限制,另外,还可以在三维空间利用矩阵进行变换
1 | BaseWidget.dart |
DisplayImage.dart
Stack(
// Aligment 的取值范围为 [-1, 1],Stack 中心为 (0, 0),
// 这里设置为 (-0.5, -0.5) 后,可以让文本对齐到 Container 的 1/4 处
alignment: const Alignment(-0.5, -0.5),
children:
Container(
width: 200.0,
height: 200.0,
color: Colors.blue,
),
Text(‘foobar’),
],
);
1 |
|
BaseWidget.dart
Row row = new Row(
children:
new Expanded(
flex : 1,
child: new Text(‘Deliver features faster’, textAlign: TextAlign.center),
),
new Expanded(
flex : 1,
child: new Text(‘Craft beautiful UIs’, textAlign: TextAlign.center),
),
new Expanded(
flex : 2,
child: new FittedBox(
fit: BoxFit.contain, // otherwise the logo will be tiny
child: const FlutterLogo(),
),
),
],
);1
2
3
4
5
6
7
8
9
10
11
12
13
14
15
16
17
18
19
20
21
22
23
24
25
26
27


##### Text
Container(
child: Center(
child: Text('hello world hello world hello world hello world hello world ' ,
textAlign: TextAlign.center,
overflow: TextOverflow.ellipsis,
style: TextStyle(
color: Colors.red,
fontSize: 30.0,
letterSpacing: 2.0,
fontFamily: 'Raleway',
fontStyle: FontStyle.normal
),),
),
)
结果:

#### TextField ,Checkbox ,Switch,AlertDialog,RaisedButton , FlatButton
BaseWidget.dart
TextField textFormField = TextField(
decoration: InputDecoration(
labelText: “you select is ${isTrue == true ? “true “ : “false”}”,
),
onChanged: (str){
setState(() {
textContent = str;
});
  },
);

Checkbox checkbox = Checkbox(
    value: isTrue,
    onChanged: (bool) {
      setState(() {
        isTrue = bool;
      });
    });

Switch witch = Switch(
  value: isTrue,
  onChanged: (bool) {
    setState(() {
      isTrue = bool;
    });
  },
);

AlertDialog alertDialog = AlertDialog(
  title: Text('标题'),
  content: Text(textContent),

);
var flatBtn = FlatButton(
  onPressed: () => print('FlatButton pressed'),
  child: Text('BUTTON'),
);
1 | #### Icon |
const Icon(this.icon//IconDate, {
Key key,
this.size,//大小
this.color,//颜色
this.semanticLabel,//标志位
this.textDirection,//绘制方向,一般使用不到
})
在Flutter内部为我们提供了material_fonts,在安装目录flutter\bin\cache\artifacts\material_fonts下
在Flutter中,我们可以根据Icons中定义的图标来进行引入,在Icon是中大概定义了1000个左右的Icon。
使用内置Icon图片代码
new Center(
child: new Icon(Icons.android,size: 100.0),
)1
2
3
4
5
6
7
8
9
10
11
使用第三方图标
制作字体库
- https://icomoon.io/app/#/select
- http://iconfont.cn/?spm=a313x.7781069.1998910419.d4d0a486a

#### GridView
GridView.dart
GridView.count(
primary: false,
scrollDirection: Axis.vertical,
padding: EdgeInsets.all(2.0),
crossAxisCount: 2,
children:
makeCardView(Icons.add, ‘add’),
makeCardView(Icons.list, ‘list’),
makeCardView(Icons.map, ‘map’),
makeCardView(Icons.close, ‘close’),
makeCardView(Icons.share, ‘share’),
makeCardView(Icons.star, ‘start’),
makeCardView(Icons.add, ‘add’),
makeCardView(Icons.list, ‘list’),
makeCardView(Icons.map, ‘map’),
makeCardView(Icons.close, ‘close’),
makeCardView(Icons.share, ‘share’),
makeCardView(Icons.star, ‘start’),
],
);1
2
3
#### 图片加载
使用 Image,可以让我们向用户展示一张图片。图片的来源可以是网络、文件、资源和内存,它们对应的构造函数分别是
Image.asset(name);
Image.file(file);
Image.memory(bytes);
Image.network(src);
DisplayImage.dart
@override
Widget build(BuildContext context) {
final url = “https://gw.alicdn.com/tfs/TB1SZxwBuuSBuNjy1XcXXcYjFXa-828-374.png";
return MaterialApp(
title: ‘display image’,
home: Scaffold(
appBar: AppBar(
title: new Text(‘display image’),
),
body: Image.network(url),
),
);
}
1 |
|
TestAnimationUI.dart
class _MyFadeTest extends State
AnimationController controller;
CurvedAnimation curve;
@override
void initState() {
controller = new AnimationController(duration: const Duration(milliseconds: 2000), vsync: this);
curve = new CurvedAnimation(parent: controller, curve: Curves.elasticInOut);
}
@override
Widget build(BuildContext context) {
return new Scaffold(
appBar: new AppBar(
title: new Text(widget.title),
),
body: new Center(
child: new Container(
child: new FadeTransition(
opacity: curve,
child: new FlutterLogo(
size: 100.0,
)))),
floatingActionButton: new FloatingActionButton(
tooltip: ‘Fade’,
child: new Icon(Icons.brush),
onPressed: () {
controller.forward();
},
),
);
}
}1
2
#### InkWell 水波纹效果
InkWell.dart
new InkWell(
// When the user taps the button, show a snackbar
onTap: () {
Scaffold.of(context).showSnackBar(new SnackBar(
content: new Text(‘Tap’),
));
},
child: new Container(
padding: new EdgeInsets.all(12.0),
child: new Text(‘Flat Button’),
),
);1
2
3
#### SharedPreferences
在pubspec.yaml 文件中引入SharedPreferences 插件
dependencies:
flutter:
sdk: flutter
The following adds the Cupertino Icons font to your application.
Use with the CupertinoIcons class for iOS style icons.
cupertino_icons: ^0.1.2
shared_preferences: “0.4.2”
1 | 例子: |
share_preference_demo.dart
void saveSharedPrefence() async {
SharedPreferences sharedPreferences = await _sPres;
listOne.add(textEditingController.text);
sharedPreferences.setStringList(“list”, listOne);
textEditingController.clear();
}
void clearSharedPrefence() async {
SharedPreferences sharedPreferences = await _sPres;
sharedPreferences.clear();
setState(() {
listOne = [];
listTwo = [];
});
}
void getString () async {
SharedPreferences sharedPreferences = await _sPres;
listTwo = sharedPreferences.getStringList(“list”);
setState(() {
});
}1
2
3
4
5
6
7
8
9
10
11
12
13
14
15
16
17
18
19
20
21
22
23
24
25
26
27
28
29
30
31
32
33
34
35
36
37
38
39
40
#### 异步和线程
##### isolate
[官方文档](https://api.dartlang.org/stable/1.24.3/dart-isolate/dart-isolate-library.html)
Dart是基于单线程模型的语言。在Dart中有一个很重要的概念叫isolate,它其实就是一个线程或者进程的实现,具体取决于Dart的实现。默认情况下,我们用Dart写的应用都是运行在main isolate中的(可以对应理解为Android中的main thread)。当然我们在必要的时候也可以通过isolate API创建新的isolate,多个isolate可以更好的利用多核CPU的特性来提高效率。但是要注意的是在Dart中isolate之间是无法直接共享内存的,不同的isolate之间只能通过isolate API进行通信。
##### event loop
[官方文档](https://webdev.dartlang.org/articles/performance/event-loop)
在Dart运行环境中也是靠事件驱动的 ,通过event loop不停的从队列中获取消息或者事件来驱动整个应用的运行。但是不同点在于一个Dart编写的app中一般有两个队列,一个叫做event queue,另一个叫做microtask queue.
- event queue包含所有外来的事件:I/O,mouse events,drawing events,timers,isolate之间的message等。任意isolate中新增的event(I/O,mouse events,drawing events,timers,isolate的message)都会放入event queue中排队等待执行.
- microtask queue只在当前isolate的任务队列中排队,优先级高于event queue

这张图以main isolate为例,描述了app运行时一个isolate中的正常运行流程。
- 启动app。首先执行main方法。
- 在main方法执行完后,开始处理microtask queue,从中取出microtask执行,直到microtask queue为空。这里可以看到event loop在运行时是优先处理microtask queue的。
- 当microtask queue为空才会开始处理event queue,如果event queue不为空则从中取出一个event执行。
- 这里要注意的是event queue并不会一直遍历完,而是一次取出一个event执行,执行完后就回到前面去重新判断microtask queue是否为空。
- 所以这里可以看到microtask queue存在的一个重要意义是由它的运行时机决定的,当我们想要在处理当前的event之后,并且在处理下一个event之前做一些事情,或者我们想要在处理所有event之前做一些事情,这时候可以将这些事情放到microtask queue中。
- 当microtask queue和event queue都为空时,app可以正常退出。
>
>Note:
当event loop在处理microtask queue时,会阻塞住event queue。绘制和交互等任务是作为event存放在event queue中的,所以当microtask queue中任务太多或处理时长太长,将会导致应用的绘制和交互等行为被卡住。
##### feture async await
- Future是Dart中提供的一个类,它用于封装一段在将来会被执行的代码逻辑。构造一个Future就会向event queue中添加一条记录
- 在Dart中我们可以通过async关键字来声明一个异步方法,异步方法会在调用后立即返回给调用者一个Future对象,而异步方法的方法体将会在后续被执行
- await表达式的表达式部分通常是一个Future类型,即在await处挂起后交出代码的执行权限直到该Future完成。在Future完成后将包含在Future内部的数据类型作为整个await表达式的返回值,接着异步方法继续从await表达式挂起点后继续执行
例子:
import 'dart:async';
Future<void> printDailyNewsDigest() async {
  var newsDigest = await gatherNewsReports();
  print(newsDigest);
}

main() {
  printDailyNewsDigest();
  printWinningLotteryNumbers();
  printWeatherForecast();
  printBaseballScore();
}

printWinningLotteryNumbers() {
  print('Winning lotto numbers: [23, 63, 87, 26, 2]');
}

printWeatherForecast() {
  print("Tomorrow's forecast: 70F, sunny.");
}

printBaseballScore() {
  print('Baseball score: Red Sox 10, Yankees 0');
}

const news = '<gathered news goes here>';
const oneSecond = Duration(seconds: 1);
执行结果:
Winning lotto numbers: [23, 63, 87, 26, 2]
Tomorrow's forecast: 70F, sunny.
Baseball score: Red Sox 10, Yankees 0
<gathered news goes here>
1 |  |
main() async {
await printDailyNewsDigest();
await printWinningLotteryNumbers();
doSomethingWith(await printWeatherForecast());
}
printDailyNewsDigest()
.then((aValue) => printWinningLotteryNumbers())
.then((bValue) => printWeatherForecast())
.then((cValue) => printBaseballScore());
结果:
Winning lotto numbers: [23, 63, 87, 26, 2]
Tomorrow’s forecast: 70F, sunny.
Baseball score: Red Sox 10, Yankees 0
1 | ##### 网络请求和response 解析 |
GetData.dart
import ‘package:flutter/material.dart’;
import ‘package:flutter/rendering.dart’;
import ‘package:http/http.dart’ as http;
import ‘dart:async’;
import ‘dart:convert’;
main(){
debugPaintSizeEnabled=true;
runApp(MaterialApp(
title: ‘fetch get data’,
home: new MyApp(),
));
}
Future
final response = await http.get(
‘https://jsonplaceholder.typicode.com/posts/1',
headers: {“key”:”value1”}
);
if(response.statusCode == 200){
return Get.formJson(json.decode(response.body));
}else{
throw Exception(‘Failed to load post’);
}
}
class Get{
final int userId;
final int id;
final String title;
final String body;
Get({this.userId, this.id, this.title, this.body});
factory Get.formJson(Map
return Get(userId:maps[‘userId’], id:maps[‘id’], title:maps[‘title’], body:maps[‘body’]);
}
}
class MyApp extends StatelessWidget{
@override
Widget build(BuildContext context) {
return Scaffold(
appBar: AppBar(
title: Text(‘fetch get data’),
),
body: Center(
child: FutureBuilder(
future: fetchGet(),
builder: (context,snapshot){
if (snapshot.hasData) {
return Text(snapshot.data.title);
} else if (snapshot.hasError) {
return Text(“${snapshot.error}”);
}
// By default, show a loading spinner
return CircularProgressIndicator();
}),
),
);
}
}1
2
3
4
5
##### 如何创建一个新isolate
例子:async_new_isolate.dart
loadData() async {
print(‘loadData…’);
ReceivePort receivePort = new ReceivePort();
await Isolate.spawn(dataLoader, receivePort.sendPort);
// 获取到子线层sendPort
SendPort sendPort = await receivePort.first;
print('sendPort:  $sendPort');
List msg = await sendReceive(sendPort, "https://jsonplaceholder.typicode.com/posts");
print('list msg:  $msg');
setState(() {
  widgets = msg;
});
}
// the entry point for the isolate
static dataLoader(SendPort sendPort) async {
print(‘dataLoader…’);
// Open the ReceivePort for incoming messages.
ReceivePort port = new ReceivePort();
// Notify any other isolates what port this isolate listens to.
sendPort.send(port.sendPort);

await for (var msg in port) {
  print('msg:  $msg');
  String data = msg[0];
  SendPort replyTo = msg[1];

  String dataURL = data;
  http.Response response = await http.get(dataURL);
  // Lots of JSON to parse
  final bodyStr = json.decode(response.body);
  print('callback msg:  ');
  replyTo.send(json.decode(response.body));
}
}
Future sendReceive(SendPort port, msg) {
ReceivePort response = new ReceivePort();
print(‘send msg: $msg’);
port.send([msg, response.sendPort]);
return response.first;
}
执行结果:
I/flutter (28815): loadData…
I/flutter (28815): dataLoader…
I/flutter (28815): sendPort: SendPort
I/flutter (28815): send msg: https://jsonplaceholder.typicode.com/posts
I/flutter (28815): msg: [https://jsonplaceholder.typicode.com/posts, SendPort]
I/flutter (28815): callback msg:
I/flutter (28815): list msg:`
综合案例
Flutter 插件库
性能
flutter 问题?
包大小增大
Android的Apk增加8M,iOS压缩包增加16M。